Search This Blog

Showing posts with label Ornament. Show all posts

Thursday, December 20, 2018

An Attitude of Thankfulness

Decorating our Christmas tree always makes me thankful.
We have "filler" ornaments, sure, but the majority of our ornaments hold special meaning for us.  When we travel, we often buy an ornament to commemorate it.  Additionally, in our now nearly 8 years of marriage, we have been through quite a few milestones - not to mention the ones from before that.  Many of which are immortalized in the form of ornaments.


Every year, as we search through the crumpled paper towel sheets we use to protect this precious cargo, I am reminded of so many - good, but also sometimes hard - things that the Lord has brought us through.  We, as missionaries literally live off of the generosity of others - and thankfulness is the overarching emotion I feel.  Especially this time of year.  These ornament are tangible reminders of that.

Here are some of the ornaments that hold special meaning.


1. Baby's First Christmas Ornaments 
There will never be a day that I won't get teary pulling these out! Those teeny-tiny fingers and toes... I can't even stand it!  I even made sure that when we made these, I made an extra, so that if/when the kiddos ever want one for their trees when they're adults... I can still have mine.  #momwin
These ornaments make me so thankful for the little lives God has entrusted to us!  


2. Felt Cupcake
This ornament.  This was the year that finances were so tight, that these handmade felt cupcake ornaments were the only gifts we could afford to give.  I'm thankful for this year.  This was our first year as a married couple.  This was the year of Arby's chocolate turnover dates, Ramen noodles, no health insurance, not being sure if we had enough gas in the car to run errands, getting signed up to bring food to an event - and then not having enough to make dinner for us... It taught us to economize, to appreciate what we have, and enjoy the REAL spirit of Christmas.

3. Travel Ornaments  

I am so thankful for the ability to travel, and see new places.  These ornaments remind me of all the fun family memories we've shared.


4. White House Ornaments
My dad's dad, my Gramps used to buy my mom these ornaments that the White House Society puts out every year - and then when I got married, he did for us too.  In 2016, I lost three of my grandparents - one of them being my Gramps.  Dan's grandma also passed away that year.  Aidan, our 2 year-old (at the time) attended 3 funerals that year - and was an absolute dream.  I was a pall-bearer in my Gran's funeral.  When Gran passed away, we put together pictures for the reception afterwards, and numbered them for the slideshow.
3 months later, we were putting together a slideshow for Gramps' funeral.  The next number in the slideshow would've been 12, but I was looking at a picture that was already numbered 13, and was wondering where I went wrong with the numbering, when I realized - I hadn't gotten it wrong, it was just still numbered from Gran's funeral.  
After they passed, my mom continued the tradition.  Every year, when I take them out, I am thankful for my extended family, and the time we had together.


5. The Coolest Ornament
One year, I sent my mom a random picture of an ornament that I LOVED.  Somehow she found it, and I got it for Christmas that year! It's an urchin and a spindle - it's amazingly fragile and beautiful, and somehow made it across the ocean.
I'm so thankful for a mama who knows my heart.


6. Coffee
Coffee.  I'm not even kidding.  I'm thankful for coffee.  


7. My Oldest Home
Hungary.  


8. My Last Home
USA - Jacksonville.


9. My Current, and Beloved Home
Slovenia.  I love it here so much!  It has felt like home since the moment we got here.  I am so thankful that we get to live and thrive in Slovenia.


This is from when we went hiking a couple months after we moved here. <3


10.  The Person With Whom I Will Be Home No Matter What
I am so thankful for Dan.  So many of the wonderful things in my life are because of who I get to spend that life with.  


So, this holiday season, I encourage you to take the time to reminisce over the moments that your ornaments represent.  When you think about those memories, take the time to thank God for the good... and also the hard things He's brought you through.  Often times we wouldn't get to the happy memories, if it weren't for the tough ones.


Friday, December 8, 2017

Natural Christmas Decoration Ideas

The Christmas season is in full swing in the Blair household!
For the first time in a few years, we have our own space, and can really realize our own interpretation of Christmas.  For a couple years we lived with a friend, and she was always super generous in letting me put out my Christmas decor, but it's a whole different feeling when it's in your own home.  Add to the excitement of it, that we're finally in Slovenia after nearly 2 years of talking about it - the magic is definitely there.


In the age of Joanna Gaines, DIY and hipsters, it's not revolutionary of me to say that I love natural Christmas decor, but there you have it!  I like looking at 50s-60s inspired Christmas decor, and trees busting with shiny-brite-style ornaments - in fact I have a couple boxes of shiny-brite reproductions from a dear sweet woman who loves me as her own, and they are precious to me.

But in this season of my life, natural beauty is what is really speaking to me.  One of the reasons, I'm sure is that Slovenia is the "Green Capital" of Europe.  People here are really into organic, local, natural, etc.  It's basically hipster heaven.
Another reason probably, is the easy access to a local market.  And then, of course there's just the esthetic of it.  So, this holiday season I've made a few natural Christmas decor things, and thought I'd share them with you, in case you feel inspired to do the same!

One of the best things about this, is you need basically the same 5-6 items for all of these.  Here's what you're going to want to stock up on:

Star anise
Cinnamon sticks
Oranges
Twine
Cloves
Rosemary
Cranberries
Pop corn
Holly, or any other red berries


1. Dried Orange Slices

A couple weeks ago, I wrote a post about making a dried orange slice garland.  The instructions are all there, and we had lots of fun making them.  My garland actually fell the day after I posted about it, so I just kept the slices, and ended up using them later.


2. Okay, a couple things I bought

So, as I mentioned, having a local market is a dream come true.  The produce is local, the flowers are as well, the prices are so affordable, and there is always about 5 ladies selling wreaths they've made.  So, about a month ago, I found some red berries.  The lady selling them told be to spray them with hair spray, and they'd keep.  That didn't quite pan out, unfortunately, but luckily I like how they look dried too.  The next week I bought some branches of cotton, and added them to it.  I love how it looked!


Yesterday we went down again, and I totally fell in love with this wreath.  The sweet man we bought it from gave Aidan a tulip, which our flower-loving-boy is cherishing!


This wreath just screams Christmas, and I can't get over it.  Something like this would be easy enough to make, you would need different types of greenery, berries and pinecones, and you're good to go!


3. Cranberry and Pop Corn Garland

What you'll need:
- Cranberries
- Pop corn
- Fishing line
- A large needle

Instructions:
There's really not to much to say, except to choose a cranberry/pop corn ratio that appeals to you.  I found 2 pop corn kernels to one cranberry to be the prettiest!  This is a really fun one to do together with the littles!  It's a great way to teach patterns!


4. Rosemary/Orange/Cinnamon Ornament

For this you'll need:
- Cinnamon stick
- Rosemary sprigs
- Dried orange slice
- Twine


I tried to think of the yummiest Christmas smells, and put them together.  Our apartment doesn't have many shelves, or places to hang things, so I wanted something that I could hang on our window handles.

So, I arranged about three sprigs of rosemary, with one cinnamon stick, then wrapped it together with twine.  I attached an orange slice, to where it hung off a little, and then made a hook.


5. Potpourri

Okay, when you hear potpourri, I know you're thinking of some great aunt, and a bowl of dusty dried pieces of flower in a bowl.  BUT!  This is not that.  I found a couple recipes on pinterest, and added them together to make something with things that I had, and liked the thought of.  So, here is what you need:

- About 10 cloves
- 2 cinnamon sticks
- 4 star anise
- An orange, cut in slices
- Rosemary sprigs

Other things you can add:
- A dash of vanilla
- Pine branches
- Apple slices
- Cranberries
- Lemon slices/lemon zest


You put it all in a pot, then you fill the pot with water, and let it simmer on a low setting on your stovetop for the day.  It smells divine!  You do have to check on it every once in a while, and add more water, but it'll last throughout the day.  I love how it filled the house with the warmth of Christmas smells.  It's a great way to use ingredients that are about to go bad, like too-soft oranges, or rosemary that is starting to brown.


 6. Natural "stuff" arrangement

To me, there's hardly anything more traditionally Christmas that clove studded oranges!  We always made them in school, and Aidan and I have made them every year of his short life.  So, we made some again this year, and then placed other things in the bowl, such as star anise, cinnamon sticks, rosemary, pine branches, red berries, cloves, dried orange slices... basically everything I had left.


It's simple, yet festive, and of course smells good!

Also, that beautiful runner you see there?  Yes, my amazing mama made that for me for Christmas, and yes, I'm crazy spoiled!
It's just gorgeous, and I love-love-love it!

So, there you have it!  Some ideas for easy natural Christmas decor this year.  Do you have any fun, family-friendly, DIY Christmas traditions?  I'd love to hear about them!

Have a wonderful holiday season, dear friends!

Sunday, December 3, 2017

Globe "Together in Heart" Ornament DIY Tutorial

Ahhh, it's the most wonderful time of the year!
Which for me, means it's ornament making time!  Every year, I make my family a new ornament.  One year I made a felt cupcake ornament, one year a clay one in the shape of Hungary, one year I made a wood ring one, with our family picture on it, and last year, I made Clothespin People versions of each of us.

This year, I wanted to highlight, that even though we all live so far away, that we are still all together in spirit and heart.

This is what I ended up with:


To create your own, this is what you'll need:

3-inch foam craft balls
Segmented World map (I'll upload the one I used)
Paint (a color that matches the water color)
Modge Podge
Paint brush
Paper (for the strip around)
Black Sharpie pen
Small metal hook
Twine
Red-headed pins

Here is the map I used:


Instructions:

1.  Print out map.  I printed this one out at 155%, to fit the 3-inch foam ball.  You'll want to print it out, cut it out (when you're cutting it out, cut on the inside of the black line, you don't want that on it), and try it on the ball before you commit.  I did end up having to add another segment to it, because it didn't go all the way around.  So, I used that far left segment, that is mostly the Pacific Ocean.


2. Paint the foam ball.  I wasn't sure how the foam would handle the mode podge, if it would suck it up, and cause it to warp.  When I googled it, I saw someone suggest painting it first.  I chose a color that pretty much matched the color of the water, that way if if it peeked through a little, it wouldn't be so noticeable.  


3. Let them dry.  I used toilet paper rolls for them to sit on.


4. Brush modge podge on the white side of the map, then carefully wrap it around the ball.  This part is very tricky, because the glue causes the paper to curl and stick to itself, and you're trying to line up your segments at the same time.  I had one tear, which was distressing, but honestly, mode podge forgives much.


Even with this overlapping, there was still a little bit of space left uncovered, just for reference sake.

5. Next, brush the modge podge on the outside of the ball.  Run your fingers along it, trying to get rid of any bubbles or wrinkles, paying special attention to where the segments meet up.  As it dries, every once in a while rub your fingers along it, smoothing it out.


6. Let them fully dry


6. I screwed a small hook in the top, and looped some twine through it.


7. This part is optional, but after this, I wrote out "Although we're Worlds apart, we're together in heart." on a strip of scrapbook paper.  I then played around with placement, until I liked it.  I used the modge podge again to glue it around.


8. Finally, I pushed the pins into the four places we live.  Well, approximately, because New York is close to new Hampshire, and Slovenia is close to Hungary.


And there you have it!  I hope you've enjoyed this tutorial, and even more than that, I hope my family loves their new ornament!
Please share with me your favorite Christmas traditions, or ornaments,  I'd love to see them!

Thursday, December 8, 2016

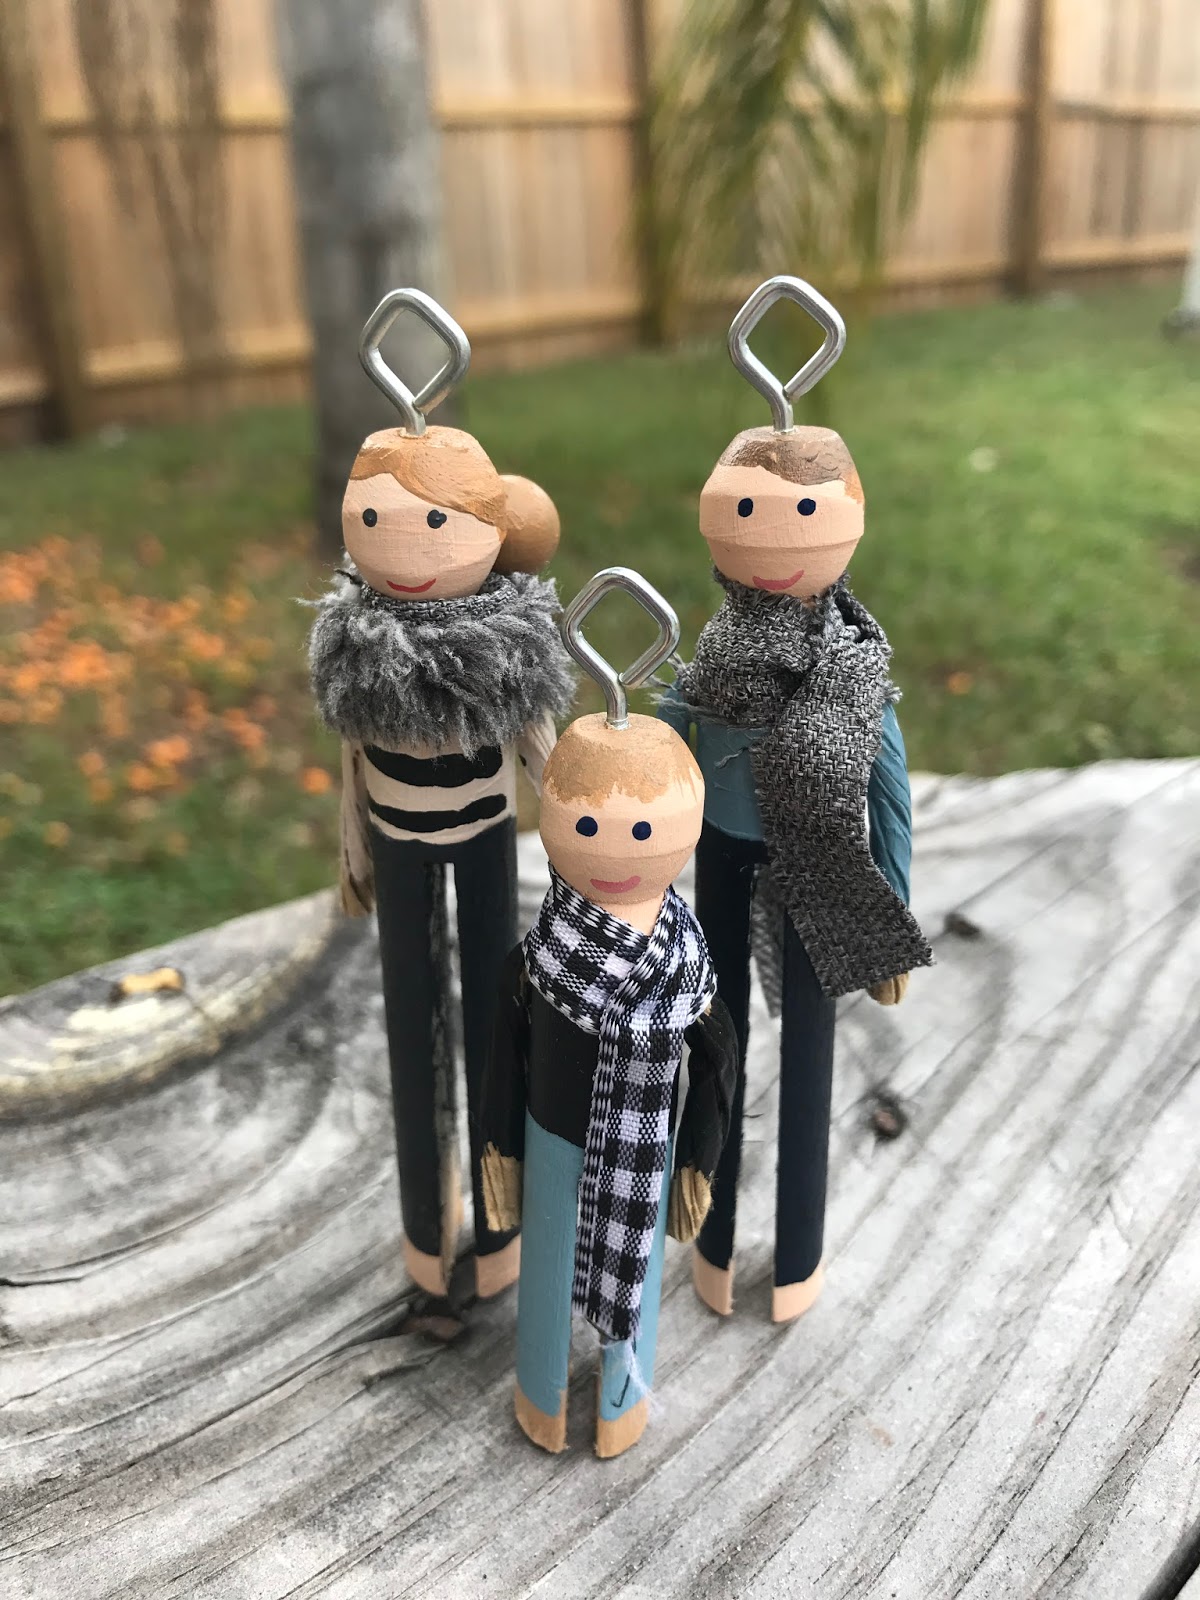
DIY Clothespin People Family Christmas Ornament Tutorial

I have this tradition, where every year, I make a Family Christmas ornament.  One year I made felt cupcakes, then clay Hungary-shaped ornaments, and last year I made wood ring ornaments with our picture modge-podged onto it.
This year, I was wishing we could all be together, and was trying to think of a way to recreate that somehow.  So, I decided to make miniatures of each of us.  I bummed around online to try to find something, but came up kind of short.  I could find pictures, but no real tutorials.  So I hope you come across this, and it is EXACTLY what you were looking for! :)

Here is the finished project:


Here's what you'll need:
- Wooden clothespins (you can find them at craft stores)
- Small screw-in hooks
- Wire that's been wrapped in butcher paper (again, craft stores)
- Acrylic paint
- Fabric swatches
- Pencil
- Super glue
- Drill
- Paint brush
- Pearl-headed pin

1. First thing I did, was paint the pin heads and feet with a skin tone.  (I made a few extra, and ended up being very glad I did, as I messed up a couple, and one split down the middle when I screwed in the hook.)


2. Next, I painted the hair.  (For the girls, I glued a bead to the back, and painted that too, to make buns.)


3. In hind-sight, this is when I would've screwed in the hook.  I did it at the end, which meant that when the head of one split, I had to scratch the whole thing.

4. Next I started working on the facial features.  For this, I used the pearl-headed pin, and a very thin paintbrush.  (For the glasses, I used a pencil, because I didn't want them to be a very "heavy" feature.)


5. Next I picked out fabric.  I knew I wanted cool colors, blues and grays.  So, I went to a craft/fabric store.  Initially I was looking for those groups of quilting squares you can buy, where all the squares go together, but couldn't find any.  Finally, I found where they have the left-over pieces, and found fun things in there.  I also got a yard each of some fun knitted ribbon/edging stuff.  (I don't know any of the technical terms, I am so not a seamstress.)  This is what I decided to go with:


(I got the red for my aunt and uncle's set, which had a different color-scheme.)

6. Next, I decided who got which material for a scarf.


7. In the meantime, I had Dan drill a hole for their arms, right where the ridge is.  I thought it made for a natural looking shoulder.


8. After that, I threaded the butcher paper wrapped wire through, and cut it to the desired length.


9.  Now for the clothes.  I went with pretty much solids, and stayed in that blue-gray color family.  (Again, this is the set I made for my uncle, hence the reds.)


10.  Then, I created the miniature scarves, and super glued them in place.

After all that, I took a "family picture" of all of us together, which was the idea behind it in the first place. :)


Here are the corresponding ornaments side by side.

Mom and Dad


Our family


Jonathan and Katie


Stephen


Our friend who we live with, Amy


My Aunt and Uncle, who host us for Thanksgiving every year


So, I gave everyone "themselves" for Christmas.

For wrapping, I found these beautiful, simple boxes at Michael's, too!  (And used red ribbon, and tags made out of old scrapbooking paper.)


And there you have it!  Please let me know if you've ever made anything similar, I'd love to hear your tips!

Do you have any similar family traditions or ornament exchanges?

Merry Christmas, and happy New Year!