Search This Blog

Showing posts with label Spring. Show all posts

Monday, April 27, 2020

Lime Cake With A Cream Cheese and Lime Glaze

Hey there!
Do you hate limes? This recipe is not for you. (Also, what is wrong with you?) Do you LOVE limes? Then this is DEFINITELY the dessert for you! 


Between the batter and the glaze, there is the zest of TWO WHOLE limes in this thing!! You're welcome. I brought the zzziiing! It has just the right amount of tartness, it's not overly sweet, and there are little lime zest pieces everywhere to delight you! I have been playing with this recipe for a couple months now, and can honestly say it's "my own", so I hope you enjoy it!

What you'll need:
- a standing mixer
- a 7 inch pan, or a bundt pan. This would probably work well in a loaf pan, too!

Ingredients:

Cake:
1 1/2 (195 gr) cups flour
1 tsp baking powder
1 cup (200 gr) sugar
2 eggs
zest of one lime
2-3 tbsp lime juice 
10 tbsp sunflower oil (canola would work, too)
10 tbsp milk

Cream Cheese and Lime Glaze:
3 oz/85 gr room temperature cream cheese
2/3 cup powdered sugar
1 tsp lime juice
zest of one lime
splash of milk


Directions:

1. Preheat your oven to 350 F / 180 C. Prep your baking dish with non-stick spray and flour.

2. Whisk together the flour and baking powder in a bowl and set aside.

3. Using the paddle attachment on your mixer, mix together the sugar and eggs on a low-medium setting for 5 minutes.

4. With the mixer still going on low, add zest, lime juice, oil and milk. Mix until smooth.

5. Spoon in flour/baking powder mixture in about 4 increments, making sure it is fully combined each time.

6. Pour into your prepped pan, and place in the oven.

7. Bake for about 50-55 minutes, or until a toothpick insterted in the middle comes out clean. (The bake time will vary, depending on what shape your pan is. I initially planned on 40 minutes, then added 5 minutes at a time. The top was getting brown though, and I was worried that it would get too brown and dry, so I put a sheet of aluminum foil over it, and it did the trick - the middle baked, while the top stayed golden.)

8. While your cake is baking, using the whisk attachment on your mixer, combine the ingredients for your glaze. (You can adjust the thickness to your liking by playing with the powdered sugar/lime juice or zest ratios - powdered sugar will thicken it but also sweeten it, so if you want it thicker but lime-y add more zest. Lime juice will thin it out.)

9. Wait for your cake to cool a bit, flip it into a cooling rack or plate. We decided to eat it pretty soon after I baked it, but you could let it come to room temperature, too.

10. Pour or spoon glaze on top to get desired effect - you could do just a little, for a rustic look, or you can completely cover the top, and even garnish with a slice of lime - like I did. :)

11. Serve, and enjoy!


Yummm! The perfect puckery lime dessert, with the comfort of being a cake!

Please let me know if you decide to try this, I would be thrilled to know how it goes!

Happy baking!

Tuesday, March 31, 2020

Strawberry Lemon Crumble - Cooked On the Grill


Okay folks, it's quarantine time. Ain't nobody got patience for a long, drawn out intro. So, I'll get straight to what you came for - the recipe for this delicious strawberry lemon crumble!


Ingredients:

Strawberry filling:
6 cups strawberries (I sliced mine into fourths)
1/2 cup sugar
2-3 tbs lemon juice
zest of 1 lemon
2 tbs cornstarch
1/4 tsp cinnamon
1 pinch of nutmeg
1/2 tsp vanilla 


Streusel topping:
1 cup flour
1/2 cup light brown sugar
1/2 tsp salt
1/2 tsp baking powder
1 cup chilled butter, cut into cubes

Directions:

1. Preheat your grill to 375 F / 190 C. You'll be grilling this on an indirect heat.

2. In a large bowl, combine all the ingredients for the filling. (This is the perfect recipe to use for smushed or slightly bruised strawberries. They don't have to be perfect-looking, because they're going to get cooked down.)

3. Using the whisk attachment on your mixer (or whisking by hand), combine all of the dry ingredients for the streusel topping.

4. Cut in the butter.

5. Pour the strawberry mixture into a skillet, then spoon the streusel topping onto it the strawberry yumminess covering as much of it as possible.

6. Quickly place the crumble in the grill. and cook for 35 minutes.


7. Carefully (using a pot holder) remove the crumble from the grill. Allow to sit for 5 minutes, and serve warm with vanilla ice cream.

Yummmmm


Ps: this recipe can easily be baked in a traditional oven, too. <3 
Pss: Keep it covered for 2-3 days on your counter. Also, it heats up deliciously. I'm eating it right now. Like I said, yummm...

Monday, February 24, 2020

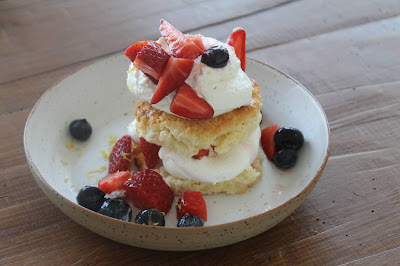
Spring-Beckoning Strawberry Shortcake


This past weekend had A LOT going on. From Wednesday on I had a sick little guy home with his sister and I, and then on Saturday we had our first Slovenian ER visit, so I decided that on Sunday we all needed a little pick-me-up.

My husband, Dan had just brought home a gorgeous pallet of strawberries, and I was itching to use them in something.


I turned to Instagram to ask my followers what they thought I should make, and as soon as I read "strawberry shortcake", I was sold! From what I learned "shortcake" can mean an array of things, from sweet biscuits/scones to spongecake. I love a recipe that uses buttermilk, and I was already out for a walk with a cranky toddler, so I decided to grab some buttermilk and heavy cream, and try my hand at this Sally's Baking Addiction recipe. It was a HUGE hit, to say the very least. It put us all in a better mood, and went perfectly with the sunshine we got that afternoon.


Ingredients:

Strawberries/Berries
- 5 cups strawberries (cut to your desired size) (and blueberries, if desired)
- 1/4 cup (50 g) granulated sugar

Vanilla Whipped Cream
- 1 tsp - 1 tbs vanilla extract (depending on how vanilla-y you want it)
- 3 tbs (38 g) granulated sugar
- 2 cups (approx.) (0.5 l) heavy whipping cream 

Shortcake/Sweet Biscuits
- 3 cups (375 g) all purpose flour
- 1/4 cup (50 g) granulated sugar
- 2 tbs baking powder
- 1 tsp salt
- 3/4 cup (180 g) unsalted butter (cubed and cold)
- 1 cup (240 ml) buttermilk
- 2 tbs (30 ml) heavy whipping cream
- coarse or raw sugar for sprinkling
- lemon zest

Directions:

1. Stir the berries and 1/4 cup sugar together, cover and place in fridge.

2. Preheat oven to 425 F/218 C. Line a baking sheet with baking paper.

3. Using the whisk attachment on your mixer (or whisking by hand) combine the dry ingredients.

4. Cut in butter until it resembles cornmeal.

5. Remove bowl from mixer. Poor buttermilk on top, and mix by hand until just combined.

6. Move to flat, lightly floured work surface. Roll out to 1/2 inch thickness. using a biscuit cutter, cut out your biscuits (without twisting the cutter), and move to the baking sheet. Reshape and roll out leftover dough until it's all used up. Make sure the biscuits are touching on the baking sheet, apparently it helps them rise. Should make 11-12.

7. Brush tops with heavy cream, and sprinkle sugar on top.

8. Bake for 15 minutes, until biscuits are golden brown on top. Allow to cool for 10 minutes. 


9. While the biscuits are baking, whip together heavy cream, vanilla and 3 tbs sugar using a standing or hand mixer on a medium speed for about 3 minutes, until soft peaks form. Move to ziplock bag, and store in fridge until ready to serve.

10. Once biscuits are cooled but still warm, cut them in half. Cut a corner tip off your ziplock bag, pipe whipped cream onto the bottom half of the biscuit (like you're frosting a cupcake), and top with some yummy berries. Then add the top half of the shortcake/biscuit, top it with some more whipped cream and berries, grate some lemon zest on, and you're done! Ta-da!!

Honestly... deeeelish!


Sunday, June 16, 2019

Spring/Summer Capsule Wardrobe For Boys


Ahhh... Kids. If only they didn't grow so fast! To help not spend exorbitant amount of money on kids’ clothes, to try and declutter, and lessen our consumption of fast fashion, I have been leaning more and more towards the concept of capsule wardrobes. In The Fall, I shared my Back To School Capsule Wardrobe, so now I wanted to share my Spring/Summer one.


Basic Pieces:
- 5 T-shirts (stripes are great, one overall pattern is okay. We also have a couple superhero shirts... thanks grandma, lol.)
- 2 tank tops
- 1 polo
- 1 short-sleeved dress shirt
- 1 long-sleeved shirt
- 1 long-sleeved dress shirt
- 1 pair of pants (whatever still fits from Fall)
- 3-4 pairs of shorts
- Swim trunks (We have an extra pair for "water day" at school.)


Here are some combinations:


Not pictured:
- 3 soft cotton shorts
- 1 pair of Crocs (they can be used as sandals and water shoes)
- 1 pair of rain boots
- 1 pair of tennis shoes
- 1 raincoat (or some other kind of transitional jacket. We got a raincoat, because we walk to school pretty regularly, but if you drive mostly, a leather jacket is also fun.)
- 3-4 pairs of pajamas
- underwear and socks
- sunglasses
- baseball hat


Here is the raincoat.

Tips:
- If your kid likes to slide on his knees like mine, and his sweatpants have holes in them, cut the legs off right above the knee - ta-da!! Easy shorts! I also did this for his pajama pants, and paired them with a complimenting colored plain T-shirt he already had.
- For both of my kids, I have a drawer in their closet that is their "transition" drawer. One half has clothes for them to grow into (things I've bought ahead of time when they were on sale) which I have labelled according to size. The other half are clothes that are from the previous season. So, when Spring/Summer is about to begin, I get out Aidan's clothes from last Spring/Summer to see what still fits him. Whatever doesn't fit gets donated, and of course we keep what fits. This way I'm only buying new things he needs. This year for example, I managed to only buy one pair of new shorts and a couple shirts.
- My son loves superheroes, so of course we have some "outlying" graphic tees. I try really hard to not get too hung up on them, and those are what he wears to school or camp, especially on "fun" days.


Places We Like To Shop:
H&M - Mainly, we get basics here, such as underwear, pajamas, soft cotton shorts and shirts. They have a "Conscious" line, which we try to buy when we can. The quality can be lacking, but if you stain-stick, and don't tumble dry the T-shirts, you can get quite a lot of wear. Also, you won't feel so bad about cutting them.

Petit Bateau - This store can be a little pricey, but they have very good sales. We usually shop here when their clothes are on sale, and even buy ahead for the next season. They have an overall nautical theme, which really fits our style.

Zara Kids - I love their aesthetic and style. Again, they have a "Join Life" line, which is more eco friendly, sustainable and fair-trade. We try our best to buy those things.

Okaidi - Aidan is tall and slim, and it can be hard to find him pants that fit well.  I really like this brand's pants, especially since they all have an inner adjustable band. Score!


Have you given capsule wardrobes a try? It can be difficult with kids. Have you found any tips or tricks that work for your family? Join the conversation!

Thursday, May 16, 2019

Saturn Peach Upside Down Mini Cakes


Honestly, my last few baking attempts have been a bust.  There were fallen and burnt meringues - in the same batch, too much of a new kind of flour and therefore unusable cookie dough... and I'd been feeling a little deflated about my baking efforts. But then I saw this recipe, and  decided to give it a try - I'm so glad I did!


Here's what you'll need:
- muffin pan
- standing mixer
- measuring cups and/or kitchen scale
- some bowls (for measured ingredients and mixing)


Ingredients:

- 1/3 cup room temperature butter, plus 1 tbs separately (90 gr)
- 6 tsp brown sugar (the original called for light, I only had dark - I say baker's choice!)
- 4 Saturn peaches (also known as donut peaches)
- 1 1/2 cups all purpose flour (190 gr)
- 1 tsp baking powder
- 1/2 tsp baking soda
- 1/4 tsp salt
- 2/3 cup sugar (130 gr)
- 1 large egg, beaten
- 1 tsp vanilla extract
- 1/2 cup buttermilk (120 ml) (Pinjenec, for any Slovene readers, író for any Hungarian readers)

Directions:

1. Spray nonstick cooking spray in your muffin tin. (I didn't have any, so I used butter - it was fine, but I'll be picking up some nonstick spray for next time.)

2. Preheat oven to 350 F (177 C).

3. Measure out ingredients.


4. Cut 2 1/2 peaches into thinnish slices (you'll need 48 slices), and 1 1/2 peaches into small cubes. 

5. Divide the 1 tbs of butter into 12 pieces, then put one in the bottom of each muffin hole.

6. Sprinkle 1/2 tsp of brown sugar on top of that.

7. Place 4 peach slices in the bottom of each muffin hole.  I put them in kind of a clover shape, but you could change it to 5 slices and make it a flower, or fan them out - however you like.


8. In a bowl, whisk together your dry ingredients - flour, baking soda, baking powder and salt. Set aside.


9. Using the paddle attachment on your standing mixer, cream together your sugar and (remaining 1/3 cup) butter.


10. While the mixer is going on a medium low speed, add the vanilla extract and egg.  Beat for 2-3 minutes. Your mixture will become fluffy and lighter in color.

11. While your mixer is going, add half of the flour mixture. Beat for 1 minute.

12. Pour in buttermilk, and beat for another minute. (You may need to pause mixing and scrape down the sides of your mixing bowl.)

13. Add the second half of your flour mixture, and beat until just combined.

14. Remove mixing bowl from mixer. Fold in the peach chunks. 


15. Fill each muffin hole with equal amounts of batter. The original poster used an ice cream scoop, I used the small ladle from my son's kitchen set, haha! 

16. Bake for 25-30 minutes, until toothpick inserted comes out clean.

17. Remove from oven, allow to cool in tin for 5 minutes, then flip out onto cooling rack. (If yours get a little stuck like mine, gently use a knife to detach them from the side of the muffin tin.)

18. Serve slightly warm with vanilla ice cream, or allow to cool and serve with peaches, powdered sugar, whipped cream... these little cakes are perfect on their own, but also pair well with a "friend".


And there you have it! A peachy-keen Spring or Summer treat!