Search This Blog

Showing posts with label bread. Show all posts

Tuesday, July 28, 2020

Cinnamon Twist Sourdough Sandwich bread

I have, as much of the world during this COVID-19 quarantine/shelter-in-place, jumped on the sourdough bandwagon. I'd say I'm sorry, but I am SO not. (And neither is my family.)

I am nowhere near mastering this yet, but I did come up with something on my own yesterday, so I am going to share it with you.

I have been using Melissa K Norris' sourdough sandwich bread, and we love it! (She has a great video for all of us visual learners!) I was in the mood for something a little sweet, maybe a little derivative of Pepperidge Farm's Cinnamon bread, with a little "babka" thrown in, and came up with this.

Not bad, huh?

You'll need:
- standing mixer with dough hook
- standard loaf pan
- rolling pin

Ingredients:
175 grams water (I've been using lukewarm water)
200 grams active sourdough starter
1 tbsp melted butter
1 1/2 tsp sugar
1 1/2 tsp salt
400 grams all purpose flour

+ olive oil for greasing
++ butter for very end

Cinnamon swirl:
1-2 tbsp melted butter (yep, more butter)
approx. 1/4 cup cinnamon sugar mixture (about 1:1 ratio)

Directions:
1. In a large mixing bowl combine water, starter and melted butter until fully combined.

2. Add sugar, salt and flour. Combine (by hand) until fully incorporated. Attach to your standing mixer, along with your dough hook, and knead on medium-low for 8-10 minutes. (I have found 9 minutes to be the sweet spot.) The dough should not stick to the bowl or your hands (much).

3. During this time, grease your loaf pan generously with olive oil.

4. Using a rolling pin, roll out into a rectangle on a lightly floured surface. Make sure the shorter end of the rectangle is about the size of the pan.

5. Brush the 1-2 tbsp melted butter onto the rectangle, then evenly spread the cinnamon sugar on top. (I didn't want it to be super sweet, but you could definitely add more cinnamon sugar if you want.)


6. Roll up the dough, just like you would with cinnamon rolls.

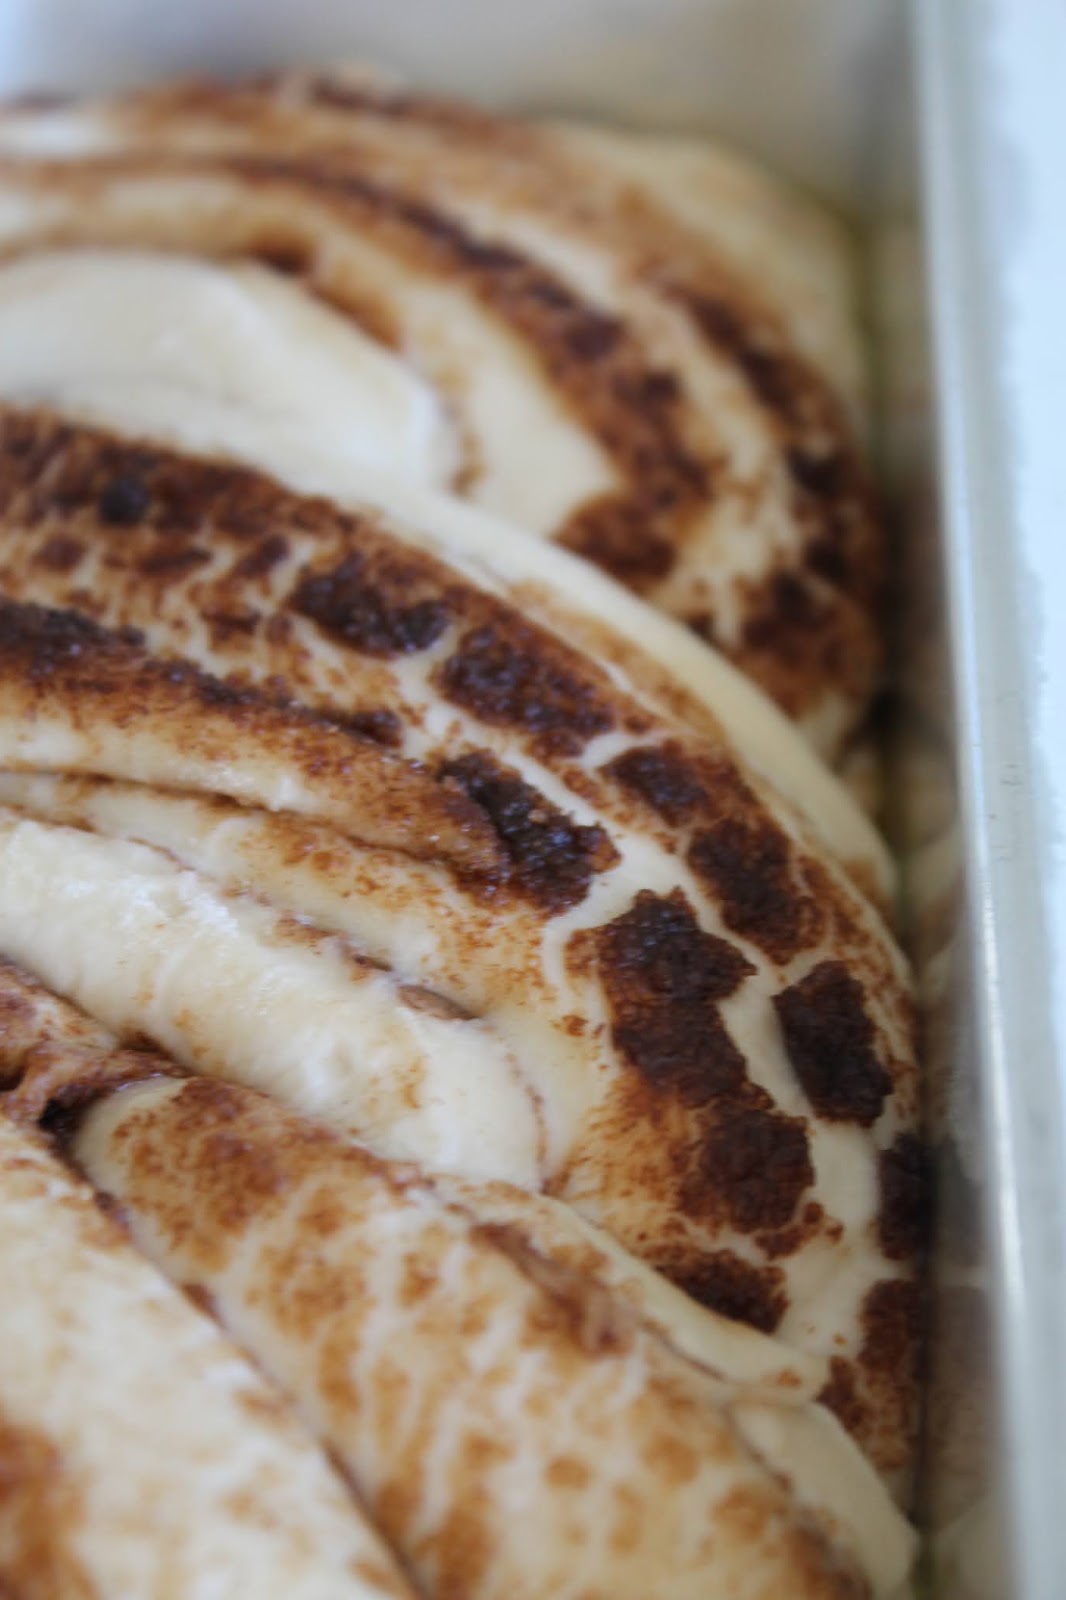
7. Using a knife, cut your loaf log in half (longwise), leaving about 1/2 inch connected at the top. 


8. Carefully twist the two sides to create "braid", tucking in the ends. Lift, and place in loaf pan.


9. Cover with a damp dish cloth, and set somewhere warm. (I use my laundry room.)

10. Allow to rise for about 5-6 hours.


11. Bake at 400 F/200 C for 30 minutes.

12. When you take it out of the oven, immediately brush some more butter on top. Allow to cool enough to remove from pan, then rub down the sides with a little extra butter, too. (What can I say!? Butter is awesome!)

13. Make sure you allow your bread to cool at least 30 minutes before you try to cut it. But once you do, and you see those (basically) magical cinnamon swirls... it's heaven!

This bread is perfect for breakfast toast, a not-so-sweet treat, or as French toast bread. Yummmm!


I'm so happy with how it turned out!
If you decide to give this baby a try, please let me know! I would love to know how it goes.

Sunday, December 9, 2018

Homemade Biscuits, Yes Ma'am!

Biscuits are ALWAYS a good idea.  Depending on where you're from, you eat them with jam, or gravy, or butter... but everyone agrees that biscuits are amazing.  So, as I've been delving into the world of bread-making, I knew biscuits were one of the first things to try.


I found this original post at Broma Bakery.  Her instructions were easy to follow, but I will write them out here for you, along with some photos.  These are great for breakfast, or for an easy dinner roll.  (If you read all the way to the end, I'll have a surprise bonus recipe for you!  Trust me, you'll want it if you make these biscuits!)

Here's what you'll need:
- stand mixer + whisk attachment and bread hook attachment
- rolling pin
- baking sheet
- baking paper
- biscuit cutter (or a round cookie cutter - you CAN do shapes, too. I made Aidan one in the shape of a Christmas tree - super fun!)
- kitchen brush
- I have found a digital kitchen scale really helpful, especially when making something off of an American recipe, but my tools/instruments are European.  Just remember, when you're Googling the conversion, especially when it's volume to weight (cup to gram, for example) that you Google specifically for the ingredient, because it will vary.  Like, "8 tbs butter in grams", etc. 


Ingredients:
2 cups all purpose flour
2 tsp sugar
1 tbs baking powder
1 tsp salt
8 tbs chilled butter (113.6 grams), cut into squares
3/4 cup buttermilk (if you're in Slovenia, it's called pinjenec, and one container is 3/4 cup, woohoo!)
1 egg beaten
optional - 1/2 cup shredded cheddar

Makes about 10.


Directions:

1. Preheat your oven to 425 F / 218 C (or 400 F / 204 C for convection oven).  Take out your baking sheets (you don't want them to get hot in the oven), and line them with baking paper.

2. Put the whisk attachment on your mixer, and on a low speed, mix together your dry ingredients - flour, sugar, baking powder and salt.


3. Turn mixer on to medium speed, and cut in butter.  (If your mixer has a splash guard, be sure and put it on.  I forgot to, and got flour everywhere.  Not only is it a hassle to clean up, but it can mess up your ratio too, if enough flew out!)  Mix until mixture resembles cornbread.


4. Stop your mixer.  Take the whisk off, and replace with bread hook attachment.  Turn mixer back on, bring to a medium speed, and gradually add buttermilk (in 3-4 stages).  I left out my 1/4 measuring cup, and used that to add the buttermilk.  Worked like a charm!  Mix until dough just comes together.  (If you're adding cheese, put that in now, too.)


5.  Lightly flour your work surface and rolling pin.  (Our apartment is a little short on kitchen workspace, so a great "hack" that I've found, is a plastic table cloth, that I can put on our dining room table - which is also an easier level for kids helping out.  That way I can clean it, and put it away until I "knead" it again.  Get it? :) )


6. Turn your biscuit dough out on it, and roll it until it is about 1 inch in thickness.

7. Flour your biscuit cutter (dip it in flour before each time you use it), and cut your biscuits out.  If you have excess dough left, you can knead it together to recreate a "ball", roll it out again, and cut more biscuits out.


8. Place them on your baking sheet.


9. Using the kitchen brush, brush the tops of them with the beaten egg - it will make a nice golden brown finish.

10. Bake for 15 minutes.  (Or 11 for convection oven.)


We had them for dinner... and dessert.  
For dessert we had them with apple jam, that Aidan's kindergarten/vrtec made (and sold as a fundraiser - we bought 5 jars of jam.  They were that good!)


But for (breakfast for) dinner, we had them with...
bacon gravy.  
And that's the surprise bonus recipe!
Dan's bacon gravy!!


Ingredients:
6 strips of bacon
1/4 cup flour
1-2 cups milk
1 tsp smoked paprika
1/2-1 tsp cajun seasoning (optional)
salt and pepper to taste

Directions:

1. Fry bacon strips.  (You can do strips or, the second time, he cut the bacon into chunks, and added them back in at the end - that was also REALLY good!)

2. Take the bacon out, keep grease in pan. 

3. Add flour, brown flour in grease, make sure it's nice and browned.

4. Add milk, whisk until no lumps are left.

5. Add more milk, until you reach the desired consistency (some people like it thicker, some like it runnier).

6. Add salt, pepper, paprika and (optional) cajun seasoning.


Et, voila!


Yumm-o!!! Enjoy!


1 Bonus Tip:
To heat up the next day, wrap them individually in tin foil, and place them in the oven at 300 F/ 150 C for a few minutes.  Nearly good as new!

Friday, December 7, 2018

Texas Roadhouse Copycat Rolls and Honey Cinnamon Butter


For the first time in my life, I own a standing mixer!  I am beyond excited at all the new recipes that have opened up to me.  Namely - bread.  If I could eat bread all day and not get fat, believe me, I wouldn't eat anything else again!
I was hoping that my first couple attempts would go really well, so I'd have the confidence to keep trying - thankfully, they did!

One of the first things I attempted was these Texas Roadhouse Copycat Rolls.  I have to be honest, the original post is AWESOME!  The lady gives step-by-step instructions along with pictures.  I baked mine in the evening, and it was already dark, so I don't have any pictures of the process.  So, if you're totally new at this (like I am), you should go check out her pictures.  

If not, keep reading, I'll give you an overview. :)

Ingredients:

For the bread:

  • 1 packet (2 1/4 teaspoons) instant yeast (FYI, the ones in Slovenia have the same amount)
  • 1/4 cup warm water
  • 1 cup whole milk, scalded and cooled to lukewarm (Do this first.)
  • 1/4 cup granulated sugar
  • 5 tablespoons unsalted butter, melted and divided
  • 1 large egg (beaten)
  • 1 teaspoon salt
  • 3 1/2 cups (437.5 grams) all-purpose flour

For the butter

  • 1 stick (1/2 cup or 113.6 grams) unsalted butter, at room temperature
  • 1/4 cup powdered sugar
  • 1/4 cup honey
  • 1 teaspoon ground cinnamon


Directions:

For the rolls:

1. In the bowl of a standing mixer, using the dough hook attachment, stir yeast, water, milk, sugar, 2 tbs of the melted butter, egg, and salt until well combined.

2. Gradually add the flour and knead on medium-low speed until the dough pulls away from the sides of the bowl.  You may need to stop the mixer and help the flour off the sides and bottom a couple times.  

3. Turn off the mixer, and let the dough rise for 3-5 minutes.

4. Knead on medium-low speed for another 5 minutes, until dough is shiny and soft.  The original post said if you needed (if it was still sticky), you could add more flour a tbs at a time.  I didn't find that I needed more.

5. Transfer dough to a large greased bowl, then flip it upside down, so butter/oil gets on both sides. (I used butter.)  

6. Cover bowl with plastic wrap (making sure it is sealed), and allow to sit and rise for about 45 minutes to an hour, until dough has doubled in size.

7. Punch down dough (I always wanted to do that!), and roll out onto a lightly floured work space.

8. Using a floured rolling pin, roll out, until you have about an inch thick rectangle(ish).

9. Cut dough into approx. 2x2 inch squares.

(Note that excess dough does NOT shape back into a useable ball, so try your best to not leave any left over.)

10. Line baking sheets (probably two large ones) with baking sheets.  Place rolls on sheets, about 3-4 inches apart, and cover with plastic wrap.  Allow to rise again for 45 minutes to an hour.

11. Preheat oven to 350F or 180C (325F or 170C for convection oven).

12. Take plastic wrap off rolls, and place in oven.  Bake for 15 minutes (or 10 in convection oven).

13.  Take them out of the oven, and brush them with leftover melted butter.

Makes about 22-24 rolls.


For butter:

1. Using the whisk attachment of your mixes, beat your butter for 30 sec on medium-high (getting to that speed gradually).

2. Add powdered sugar, honey and cinnamon, and beat for 1-2 minutes.

3. Serve with warm rolls, or store in refrigerator for up to 5 days.


Now, I haven't been to Texas Roadhouse in a really long time, so I can't attest to their authenticity, but these rolls were amazing!!!

Also, wrapped up in tinfoil and heated up in the oven the next day, they make for great little sandwich rolls!

There you have it! Very easy, nearly fool-prof rolls!
Enjoy!