Search This Blog

Showing posts with label baking adventures. Show all posts

Monday, February 24, 2020

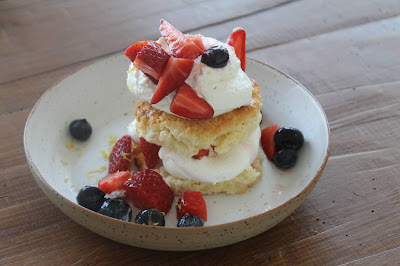
Spring-Beckoning Strawberry Shortcake


This past weekend had A LOT going on. From Wednesday on I had a sick little guy home with his sister and I, and then on Saturday we had our first Slovenian ER visit, so I decided that on Sunday we all needed a little pick-me-up.

My husband, Dan had just brought home a gorgeous pallet of strawberries, and I was itching to use them in something.


I turned to Instagram to ask my followers what they thought I should make, and as soon as I read "strawberry shortcake", I was sold! From what I learned "shortcake" can mean an array of things, from sweet biscuits/scones to spongecake. I love a recipe that uses buttermilk, and I was already out for a walk with a cranky toddler, so I decided to grab some buttermilk and heavy cream, and try my hand at this Sally's Baking Addiction recipe. It was a HUGE hit, to say the very least. It put us all in a better mood, and went perfectly with the sunshine we got that afternoon.


Ingredients:

Strawberries/Berries
- 5 cups strawberries (cut to your desired size) (and blueberries, if desired)
- 1/4 cup (50 g) granulated sugar

Vanilla Whipped Cream
- 1 tsp - 1 tbs vanilla extract (depending on how vanilla-y you want it)
- 3 tbs (38 g) granulated sugar
- 2 cups (approx.) (0.5 l) heavy whipping cream 

Shortcake/Sweet Biscuits
- 3 cups (375 g) all purpose flour
- 1/4 cup (50 g) granulated sugar
- 2 tbs baking powder
- 1 tsp salt
- 3/4 cup (180 g) unsalted butter (cubed and cold)
- 1 cup (240 ml) buttermilk
- 2 tbs (30 ml) heavy whipping cream
- coarse or raw sugar for sprinkling
- lemon zest

Directions:

1. Stir the berries and 1/4 cup sugar together, cover and place in fridge.

2. Preheat oven to 425 F/218 C. Line a baking sheet with baking paper.

3. Using the whisk attachment on your mixer (or whisking by hand) combine the dry ingredients.

4. Cut in butter until it resembles cornmeal.

5. Remove bowl from mixer. Poor buttermilk on top, and mix by hand until just combined.

6. Move to flat, lightly floured work surface. Roll out to 1/2 inch thickness. using a biscuit cutter, cut out your biscuits (without twisting the cutter), and move to the baking sheet. Reshape and roll out leftover dough until it's all used up. Make sure the biscuits are touching on the baking sheet, apparently it helps them rise. Should make 11-12.

7. Brush tops with heavy cream, and sprinkle sugar on top.

8. Bake for 15 minutes, until biscuits are golden brown on top. Allow to cool for 10 minutes. 


9. While the biscuits are baking, whip together heavy cream, vanilla and 3 tbs sugar using a standing or hand mixer on a medium speed for about 3 minutes, until soft peaks form. Move to ziplock bag, and store in fridge until ready to serve.

10. Once biscuits are cooled but still warm, cut them in half. Cut a corner tip off your ziplock bag, pipe whipped cream onto the bottom half of the biscuit (like you're frosting a cupcake), and top with some yummy berries. Then add the top half of the shortcake/biscuit, top it with some more whipped cream and berries, grate some lemon zest on, and you're done! Ta-da!!

Honestly... deeeelish!


Monday, July 1, 2019

Renae's Coffee Cake


Full disclosure - I don't know who Renae is. She was my aunt's friend, who apparently made the best coffee cake around. So, my mom got the recipe, which I now have.
So, if somehow, through the inter-webs, Renae finds this recipe, she'll see that I've given credit where credit is due, lol.

My mom used to always make this around the holidays, and it was my favorite. Even now when I visit, she makes a point of baking it for me. 
However, I am not always at my mom's house. :) and sometimes I want that pecan-y brown sugary goodness when it's NOT a holiday.
So, I got the recipe from my mom, and now I can share it with you! 

You'll Need:
- Standing mixer
- 8x12 inch pan
- Non-stick spray


Ingredients:

Batter:
- 1/2 cup room temperature butter
- 3/4 cup sugar
- 1 tsp vanilla extract
- 3 beaten eggs
- 2 cups flour
- 1 tsp baking powder
- 1 tsp baking soda
- 1 cup sour cream

Streusel Topping:
- 6 tbs butter melted, and allowed to cool for 20 minutes
- 1 cup brown sugar
- 2 tsp cinnamon
- 1 cup chopped nuts (pecans are my favorite, but walnuts work well, too)

Directions:

1. Preheat oven to 350 F/175 C. Generously spray your pan with non-stick spray.

2. Cream butter and sugar together in the (large) bowl of your standing mixer.

3. Add in eggs and vanilla. Allow to "whip" for a few minutes.

4. In a separate bowl combine dry ingredients - flour, baking powder and baking soda.

5. Alternate adding some flour mixture and sour cream to the batter. Mix thoroughly after adding each new ingredient until it's all been combined. The trick to making this cake moist is mixing it a lot. :) It'll lighten in color and become fluffy.

6. In a separate bowl combine the ingredients for the streusel topping.

7. Pour half the batter in the pan, and top with half of the streusel. Then pour the remaining batter on top, and cover in the leftover streusel.

8. Bake for 30-40 minutes, or until toothpick inserted comes out clean. I baked mine for 35 minutes, and it could've handled another couple. The top will get pretty brown, but it's supposed to. If you feel like the top of your cake is getting too brown, you can always put a sheet of aluminum foil on the top to keep that part from burning, while baking the inside a little more.

9. Allow to cool just a bit, and enjoy warm, with a cup of coffee. It's good later, too... but it's heavenly when it's warm!

Store in an airtight container for 2-3 days.


Ahhhh. Sweet serenity.

Tuesday, June 18, 2019

Mixed Summer Fruit Galette


There are some tings that get me in the mood to bake... like gorgeous fruit sitting in a basket on a counter. I wanted something quick and delicious, since my brother was visiting - and remembered my Saturn Peach Galette that I made in the Fall, and decided to use it as a launching point.

Ingredients:
1 puff pastry (that you've thawed, and had out of the fridge for 10 minutes-ish)
3 cups (approx.) pitted fruit, sliced thinly (I used nectarines, apricots and Saturn peaches.)
1/3 cup granulated sugar
1/4-1/2 tsp cinnamon (depending on how cinnamon-y you like it)
1/2 tsp lime juice
1/4 tsp vanilla extract
1 egg beaten
Coarse sugar


Directions:

1. Preheat oven to 375 F, or 190 C - or whatever your puff pastry calls for.  (Adjust for convection oven if needed.) Line a baking sheet with baking powder.

2. Wash and slice your fruit into thin slices.

3. In a large bowl, combine them with sugar, cinnamon, lemon juice and vanilla.

4. Roll out your puff pastry onto your baking sheet.

5. Pour the fruit mixture onto the middle of the puff pastry, leaving about an inch around the edge.

6. Roll the edge up over the mixture.

7. Brush the edges with the beaten egg, and sprinkle the coarse sugar on top.

8. Bake in the oven to the specifications on the puff pastry.

9. Take out of oven, allow to cool for a couple of minutes, and enjoy warm.


Wednesday, June 12, 2019

White Chocolate Macadamia Nut Cookies


Mmmm... I think we have a new addition to the Christmas cookie repertoire! Dan special requested these, and since they're one of my favorites too - I was happy to oblige!

Ingredients:
- 1 cup unsalted butter (softened)
- 1 cup brown sugar 
- 2/3 cup granulated sugar
- 2 teaspoons vanilla extract
- 2 eggs
- 1/2 tsp salt
- 1 tbs corn starch
- 1 tsp baking soda
- 1/2 tsp baking powder
- 2 1/2 cups all purpose flour
- 1 1/2 cup white chocolate chips (or, in my case, a chopped up bar of white chocolate into "morsels")
- 1 1/2 cup macadamia nuts - some chopped, some left whole

Directions:
1. Preheat oven to 325 F/165 C.

2. Cream together (manually, or in a standing mixer) butter and sugars very well.

3. Add vanilla, eggs and salt, and mix well.

4. Add corn starch, baking soda, baking powder and flour. Mix until well combined.

5. Stir in nuts and chocolate.

6. Line a baking sheet with baking paper.

7. Drop 2 tbs of dough (I used an ice cream scoop to get them all the same size) at a time, approx. 2 inches apart on the baking sheet.

8. Bake for 10-11 minutes.

9. Allow to cool in pan for a few minutes, then transfer to cooling rack. Store in an airtight container, or you can even freeze them!

Makes about 44-48.

These are delicious! I've shared them with neighbors and friends, and I can tell you - they're a hit! 
Please let me know if you decide to try these, I'd love to know how they turn out.

Here are some mouth watering pictures of these sweet things:


While I was taking pictures, I accidentally left some cookies within baby's reach - and when I turned around, she gave me the most satisfied look! Of course... I didn't let her eat it, but she loved sucking on it for a couple seconds, lol!


Sunday, May 26, 2019

Homemade Burger Bun Recipe


We love living in Slovenia! However, one of the things that we haven't been able to find are good store-bought burger buns.  Dan really enjoys grilling, and of course burgers are a classic - so he asked me if I thought I'd be able to come up with a bun recipe. I basically used my Texas Roadhouse Copycat Rolls recipe, and they were perfect. 

So, here you have it! Just in time for your Memorial Day cookout!


Here's what you'll need:
- standing mixer with a dough hook attachment
- whisk
- rolling pin
- large biscuit cutter or circle cookie cutter
- plastic wrap, or bees wrap

Ingredients:

  • 1 packet (2 1/4 teaspoons) instant yeast (FYI, the ones in Slovenia have the same amount)
  • 1/4 cup warm water
  • 1 cup whole milk, scalded and cooled to lukewarm (Do this first.)
  • 1/4 cup granulated sugar
  • 5 tablespoons unsalted butter, melted and divided into 2 and 3 tbs
  • 1 large egg (beaten)
  • 1 teaspoon salt
  • 3 1/2 cups (437.5 grams) all-purpose flour

Directions:


1. In the bowl of a standing mixer, whisk together (by hand) yeast, water, milk, sugar, 2 tbs of the melted butter, egg, and salt until well combined. Attach bowl and dough hook to mixer.

2. Gradually add the flour and knead on medium-low speed until the dough pulls away from the sides of the bowl.  You may need to stop the mixer and help the flour off the sides and bottom a couple times.  

3. Turn off the mixer, and let the dough rise for 3-5 minutes.

4. Knead on medium-low speed for another 5 minutes, until dough is shiny and soft. 

5. Transfer dough to a large greased bowl, then flip it upside down, so butter/oil gets on both sides. (I used butter.)  

6. Cover bowl with plastic wrap or bees wrap (making sure it is sealed), and allow to sit and rise for about 45 minutes to an hour, until dough has doubled in size.


7. Punch down dough (I always wanted to do that!), and roll out onto a lightly floured work space or silicone mat.


8. Using a floured rolling pin, roll out, until you have about an inch thick rectangle(ish).


9. Using the biscuit cutter, cut out your buns. Depending on the shape you rolled it out to, you should be able to get 6-8 buns. You might be able to re-knead any leftover pieces of dough, but they won't turn out as nice and smooth on top. I used the leftover to make ugly-cute dinner rolls.


10. Line baking sheets with baking paper.  Place buns on sheets, about 3-4 inches apart, and cover with plastic wrap.  Allow to rise again for 45 minutes to an hour.

11. Preheat oven to 350F or 180C (325F or 170C for convection oven).

12. Take plastic wrap off buns, and place in oven.  Bake for 18 minutes (or 13 in convection oven).

13.  Take them out of the oven, and brush them with leftover melted butter.


Makes about 6-8 rolls.

Ta-da!! These rolls were soft, but didn't fall apart while being eaten. I would make them right before serving the burgers, or make them that day and keep them in an airtight container so they don't dry out. Wrap them in tin foil and heat them up in the oven slightly just before using.


Serve with your favorite sides (we opted for bacon mac and cheese and watermelon) and prepare to wow your family and friends. My boys new BIG fans!!

Thursday, May 16, 2019

Saturn Peach Upside Down Mini Cakes


Honestly, my last few baking attempts have been a bust.  There were fallen and burnt meringues - in the same batch, too much of a new kind of flour and therefore unusable cookie dough... and I'd been feeling a little deflated about my baking efforts. But then I saw this recipe, and  decided to give it a try - I'm so glad I did!


Here's what you'll need:
- muffin pan
- standing mixer
- measuring cups and/or kitchen scale
- some bowls (for measured ingredients and mixing)


Ingredients:

- 1/3 cup room temperature butter, plus 1 tbs separately (90 gr)
- 6 tsp brown sugar (the original called for light, I only had dark - I say baker's choice!)
- 4 Saturn peaches (also known as donut peaches)
- 1 1/2 cups all purpose flour (190 gr)
- 1 tsp baking powder
- 1/2 tsp baking soda
- 1/4 tsp salt
- 2/3 cup sugar (130 gr)
- 1 large egg, beaten
- 1 tsp vanilla extract
- 1/2 cup buttermilk (120 ml) (Pinjenec, for any Slovene readers, író for any Hungarian readers)

Directions:

1. Spray nonstick cooking spray in your muffin tin. (I didn't have any, so I used butter - it was fine, but I'll be picking up some nonstick spray for next time.)

2. Preheat oven to 350 F (177 C).

3. Measure out ingredients.


4. Cut 2 1/2 peaches into thinnish slices (you'll need 48 slices), and 1 1/2 peaches into small cubes. 

5. Divide the 1 tbs of butter into 12 pieces, then put one in the bottom of each muffin hole.

6. Sprinkle 1/2 tsp of brown sugar on top of that.

7. Place 4 peach slices in the bottom of each muffin hole.  I put them in kind of a clover shape, but you could change it to 5 slices and make it a flower, or fan them out - however you like.


8. In a bowl, whisk together your dry ingredients - flour, baking soda, baking powder and salt. Set aside.


9. Using the paddle attachment on your standing mixer, cream together your sugar and (remaining 1/3 cup) butter.


10. While the mixer is going on a medium low speed, add the vanilla extract and egg.  Beat for 2-3 minutes. Your mixture will become fluffy and lighter in color.

11. While your mixer is going, add half of the flour mixture. Beat for 1 minute.

12. Pour in buttermilk, and beat for another minute. (You may need to pause mixing and scrape down the sides of your mixing bowl.)

13. Add the second half of your flour mixture, and beat until just combined.

14. Remove mixing bowl from mixer. Fold in the peach chunks. 


15. Fill each muffin hole with equal amounts of batter. The original poster used an ice cream scoop, I used the small ladle from my son's kitchen set, haha! 

16. Bake for 25-30 minutes, until toothpick inserted comes out clean.

17. Remove from oven, allow to cool in tin for 5 minutes, then flip out onto cooling rack. (If yours get a little stuck like mine, gently use a knife to detach them from the side of the muffin tin.)

18. Serve slightly warm with vanilla ice cream, or allow to cool and serve with peaches, powdered sugar, whipped cream... these little cakes are perfect on their own, but also pair well with a "friend".


And there you have it! A peachy-keen Spring or Summer treat!