Search This Blog

Showing posts with label whipped cream. Show all posts

Monday, February 24, 2020

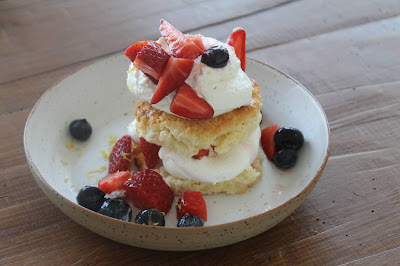
Spring-Beckoning Strawberry Shortcake


This past weekend had A LOT going on. From Wednesday on I had a sick little guy home with his sister and I, and then on Saturday we had our first Slovenian ER visit, so I decided that on Sunday we all needed a little pick-me-up.

My husband, Dan had just brought home a gorgeous pallet of strawberries, and I was itching to use them in something.


I turned to Instagram to ask my followers what they thought I should make, and as soon as I read "strawberry shortcake", I was sold! From what I learned "shortcake" can mean an array of things, from sweet biscuits/scones to spongecake. I love a recipe that uses buttermilk, and I was already out for a walk with a cranky toddler, so I decided to grab some buttermilk and heavy cream, and try my hand at this Sally's Baking Addiction recipe. It was a HUGE hit, to say the very least. It put us all in a better mood, and went perfectly with the sunshine we got that afternoon.


Ingredients:

Strawberries/Berries
- 5 cups strawberries (cut to your desired size) (and blueberries, if desired)
- 1/4 cup (50 g) granulated sugar

Vanilla Whipped Cream
- 1 tsp - 1 tbs vanilla extract (depending on how vanilla-y you want it)
- 3 tbs (38 g) granulated sugar
- 2 cups (approx.) (0.5 l) heavy whipping cream 

Shortcake/Sweet Biscuits
- 3 cups (375 g) all purpose flour
- 1/4 cup (50 g) granulated sugar
- 2 tbs baking powder
- 1 tsp salt
- 3/4 cup (180 g) unsalted butter (cubed and cold)
- 1 cup (240 ml) buttermilk
- 2 tbs (30 ml) heavy whipping cream
- coarse or raw sugar for sprinkling
- lemon zest

Directions:

1. Stir the berries and 1/4 cup sugar together, cover and place in fridge.

2. Preheat oven to 425 F/218 C. Line a baking sheet with baking paper.

3. Using the whisk attachment on your mixer (or whisking by hand) combine the dry ingredients.

4. Cut in butter until it resembles cornmeal.

5. Remove bowl from mixer. Poor buttermilk on top, and mix by hand until just combined.

6. Move to flat, lightly floured work surface. Roll out to 1/2 inch thickness. using a biscuit cutter, cut out your biscuits (without twisting the cutter), and move to the baking sheet. Reshape and roll out leftover dough until it's all used up. Make sure the biscuits are touching on the baking sheet, apparently it helps them rise. Should make 11-12.

7. Brush tops with heavy cream, and sprinkle sugar on top.

8. Bake for 15 minutes, until biscuits are golden brown on top. Allow to cool for 10 minutes. 


9. While the biscuits are baking, whip together heavy cream, vanilla and 3 tbs sugar using a standing or hand mixer on a medium speed for about 3 minutes, until soft peaks form. Move to ziplock bag, and store in fridge until ready to serve.

10. Once biscuits are cooled but still warm, cut them in half. Cut a corner tip off your ziplock bag, pipe whipped cream onto the bottom half of the biscuit (like you're frosting a cupcake), and top with some yummy berries. Then add the top half of the shortcake/biscuit, top it with some more whipped cream and berries, grate some lemon zest on, and you're done! Ta-da!!

Honestly... deeeelish!


Thursday, March 21, 2019

Pavlova Recipe - First Attempt


There was a woman at our college who made Pavlova for her birthday one year, invited us all over, and I've been craving one ever since.  That was 10 years ago.  Pavlova is an Australian dessert named after a ballerina - so of course it's lighter than air.  Pavlova have scared me, and I really can't explain why.  The egg whites?  The possibility of it falling?  I don't know.  But, spring is FINALLY here, and I finally tried it today.  It was not perfect, but I think I know what I messed up, and overall it wasn't a bad first try!
So, here it goes!


You'll need:
- stand mixer
- whisk attachment
- baking sheet
- baking paper
- something that is a 9 inch round
- pencil


Ingredients:

Shell:
- 4 egg whites (separated chilled, but brought to room temp.)
- 1 cup granulated sugar
- 1 tsp. pure vanilla extract
- 1 tsp. corn starch
- 1/2 tsp cream of tartar


Lemon whipped cream:
- 2 cups (500 ml) heavy whipping cream
- 1/4 cup sugar
- 1/2 tsp vanilla extract
- juice of 1/2 lemon
- zest from 2 lemons (save some of this for garnish)

Strawberries (or any other yummy fruit to top with)


Directions:

1. Preheat oven to 300 F/150 C.  If you have a convection oven, make sure you have it set to regular oven - I made that mistake, and after 10 minutes of it being on the convection setting, and it already started to brown - aaaaaaaaaahhhhhh!!!!  SO, mine got more "toasted" than I would've liked, but oh well.  It still tasted really good!


2. In the bowl of your mixer (fitted with the whisk attachment), beat your egg whites on a medium high speed for 5 minutes, until soft peaks form.


3. Add half the sugar, and beat for another 30 seconds.  Add remaining sugar and beat on high speed until glossy stiff peaks form (about another 2 minutes).  Add vanilla extract, and beat for another 1 minute.  Using a rubber spatula, fold in corn starch and cream of tartar.


4. Trace around your 9 inch pan (or whatever) on a sheet of baking paper, and flip it over.  Place it on the baking sheet.


5. Pour the Pavlova mixture onto the baking sheet.  Use a spatula to spread the mixture out to the edges - where the pencil mark is.


6.  Place Pavlova in the oven, and turn temperature down to 200 F/ 90 C.  Bake for 60-90 minutes, until Pavlova is firm and dry. (You can put your hand in real quick to touch it really quickly.)

7. Turn off the oven, and allow the Pavlova to cool for at least 1-2 hours, but overnight is okay, too.  I waited for 4 hours.

8. Right before serving the Pavlova, make the whipped cream.  Start by whipping together the cream, sugar and vanilla extract until soft peaks start to form.  Next, pour in lemon juice and most of the zest.  Whisk until just combined.

9.  Top the Pavlova with the whipped cream and strawberries, adding a little more garnish to the top.  


Saturday, January 26, 2019

Danish Lagkage - Light and Airy Berry Cake

I have shared a Danish lagkage recipe on my blog before, but the pictures weren't great, and my baking skills have grown exponentially since then, so I thought it was high time to share it again! :)
My husband lived in Denmark for a year before we met.  Once of his favorite things from when he lived there were the birthday cakes - lagkage - which literally translates to layer cake.
He loved it, because it was airy, light, not too sweet and of course tasty.
I've only ever made it for him, but I was hosting a baby shower a week ago, and it just felt like the perfect addition!


Tools:
- Stand or hand-held mixer (for stand mixer, it really helps to have two compatible mixing bowls)  I'm going to write my recipe for a stand mixer, because that's what I have. :)  
- whisk attachment
- paddle attachment 
- 9 inch round spring cake pan
- parchment paper
- covered cake stand, or other means to store it airtight
- non-stick spray
- ladle


Ingredients:

Cakes (makes 3 layers):
6 eggs - separated (if you're not sure how to do that, here's a great, quick tutorial)
4 1/2 tablespoons cold water
1 1/2 cup sugar
1 1/2 cup all-purpose flour
2 1/2 tablespoons cornstarch
2 tablespoons baking powder
1 teaspoon salt
1 1/2 teaspoon vanilla

*by the way, 1/2 tablespoon is 1 1/2 teaspoons

It really helps me to measure out everything beforehand.


Filling:
Homemade whipped cream (2 tbs sugar for every 1 cup of heavy whipping cream - I used about 3 cups of cream)
4 cups of fresh fruit (I used berries, but you could use any "soft" fruit


Directions:


1. Preheat oven to 425 °F/ 218 °C (400 °F/ 204 °C for convection oven.)

2. Beat the egg yolks.


3. Pour beaten egg yolks, water, vanilla extract and sugar into mixing bowl.  Secure in stand mixer base.  Connect paddle attachment.  Mix for 2 minutes.


4. In a separate bowl mix together dry ingredients - flour, cornstarch, baking powder and salt. 

5. Turn mixer to a low-medium speed, and slowly add flour mixture.


6. Pour egg whites into second mixer-compatible bowl, fasten whisk attachment - and whisk until it forms stiff peaks.


7. Fold egg whites into egg yolk mixture, until completely combined.


8. Grease and flour cake pan.  Ladle out about 2 and a half "ladle's worth" (yes, that's an exact measurement, lol) of batter into the cake pan.  Shake, and hit side of pan until it distributes evenly in pan.

9. Place in oven, and bake for 8-10 minutes - until golden brown, and a toothpick inserted comes out clean.  If you find that it's getting brown on top, but not cooked through, place a piece if aluminum foil over the top.


10. Allow cake to cool some, then turn out onto baking sheet to completely cool.  Repeat twice.

Bonus tip: make sure you grease AND flour your pan.  Here is the difference between just greasing, and doing both.


11.  If making for that day, continue by making filling.  If making for the next day (it's great for that, by the way), place parchment paper between each layer, and store in an airtight container, to be assembled the next day.


Filling, and assembly:

1. Wash and pat dry your fruit.  I used raspberries, strawberries and blueberries. I cut the strawberries into slices.


2.  Using a whisk attachment, whip together cream and sugar, until peaks form.  Don't over whip, or it'll fall, and become unusable.  Sadly, I made that mistake with my first batch.  I read that using cold instruments (bowl and whisk), it works even better.

3. Start to assemble cake on the plate you plan to serve it on.  Start with a layer of cake, then add a generous amount of whipped cream (placing it it the middle of the cake, and working it out towards the edge).  Place some fruit on top of the whipped cream.  I made some fruit "stick out" a bit to give it a rustic look.  Leave the majority of the fruit for the top.


4.  Continue until you reach the top.  Mix together remaining fruit and carefully spoon onto the top.  Store in fridge or on cold balcony - lol, until ready to serve.  If there's any left over, keep it in the fridge for up to 2 days. The cake and fruit will get mushier, of course, the longer it sits, and it won't be as good.  But the next day it should still be pretty tasty.

And here is the final, beautiful result!


Tips and ideas:
1. I LOVE this batter!  It behaves beautifully - pulls away from the side of the pan, and stays flat on top, so there's no need to level it out for layering.  It is also light and delicious!  One of my more discerning friends said that it was one of the best cakes she'd ever had!

2. You could "frost" the edges too, but for this cake, I really prefer the "naked cake" look.  (Hilary Duff's wedding cake was the first naked cake I'd ever seen, and I've loved the look ever since!)

3. You can use anything you like between the layers - Nutella, jam, chocolate whipped cream! I initially was planning on making a raspberry whipped cream, but it fell, and I didn't have enough raspberries to make it again - which actually worked out, because I way preferred the crisp white cream look.

4. Get creative with the fruit!  You could do peaches, mango, papayas, blackberries... just make sure they're soft.

5. Powdered sugar or drizzled honey on top would be great, too!

And, so... let them eat cake!